Add stamps to eSigns
Once your eSign document is ready and you have added the required eSigners, you can start adding eSign stamps to the document for the eSigners to fill in.
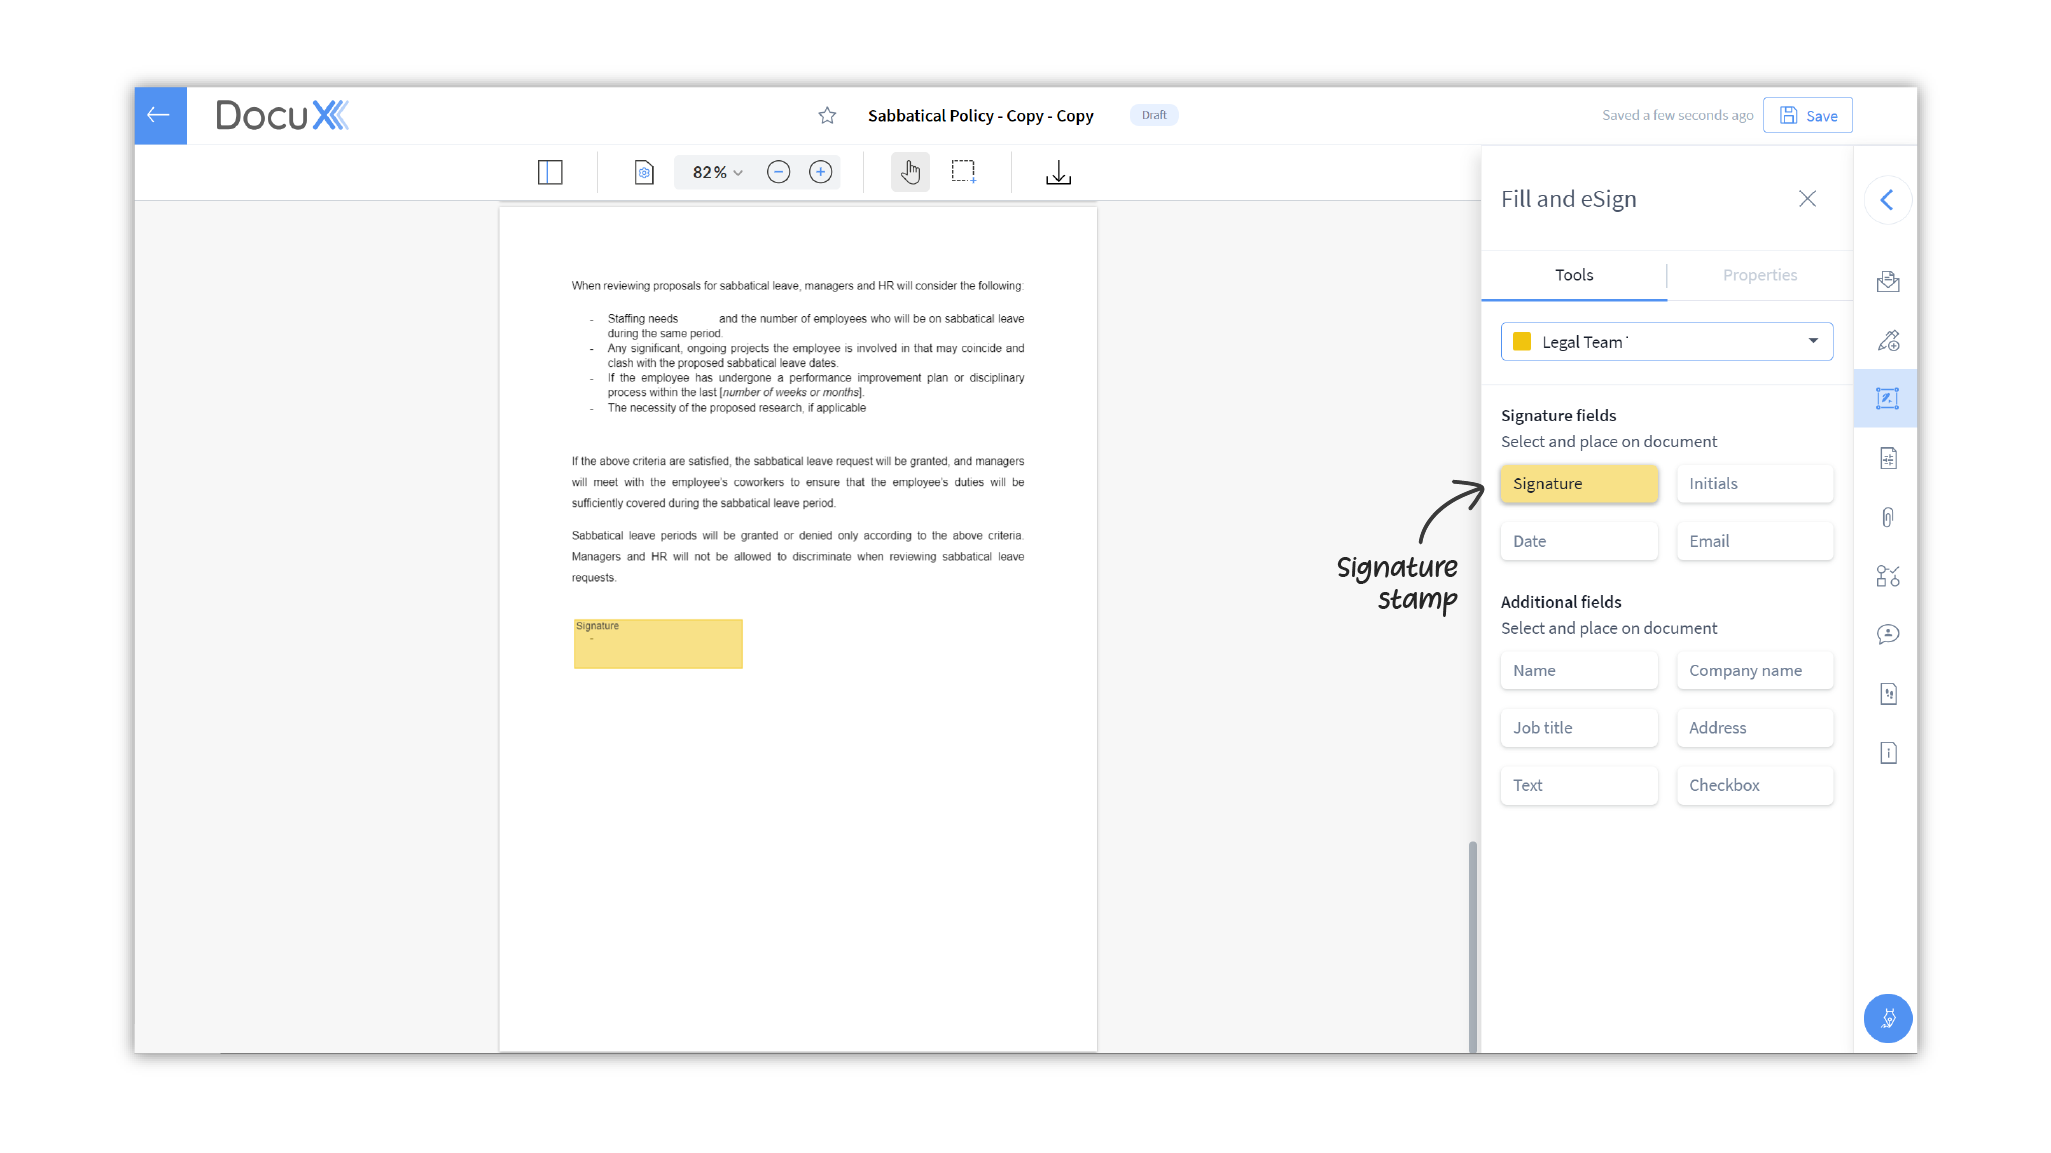
Available stamp fields
There are 10 different eSign stamp fields available and each field has its specific properties that you can customize, if needed.
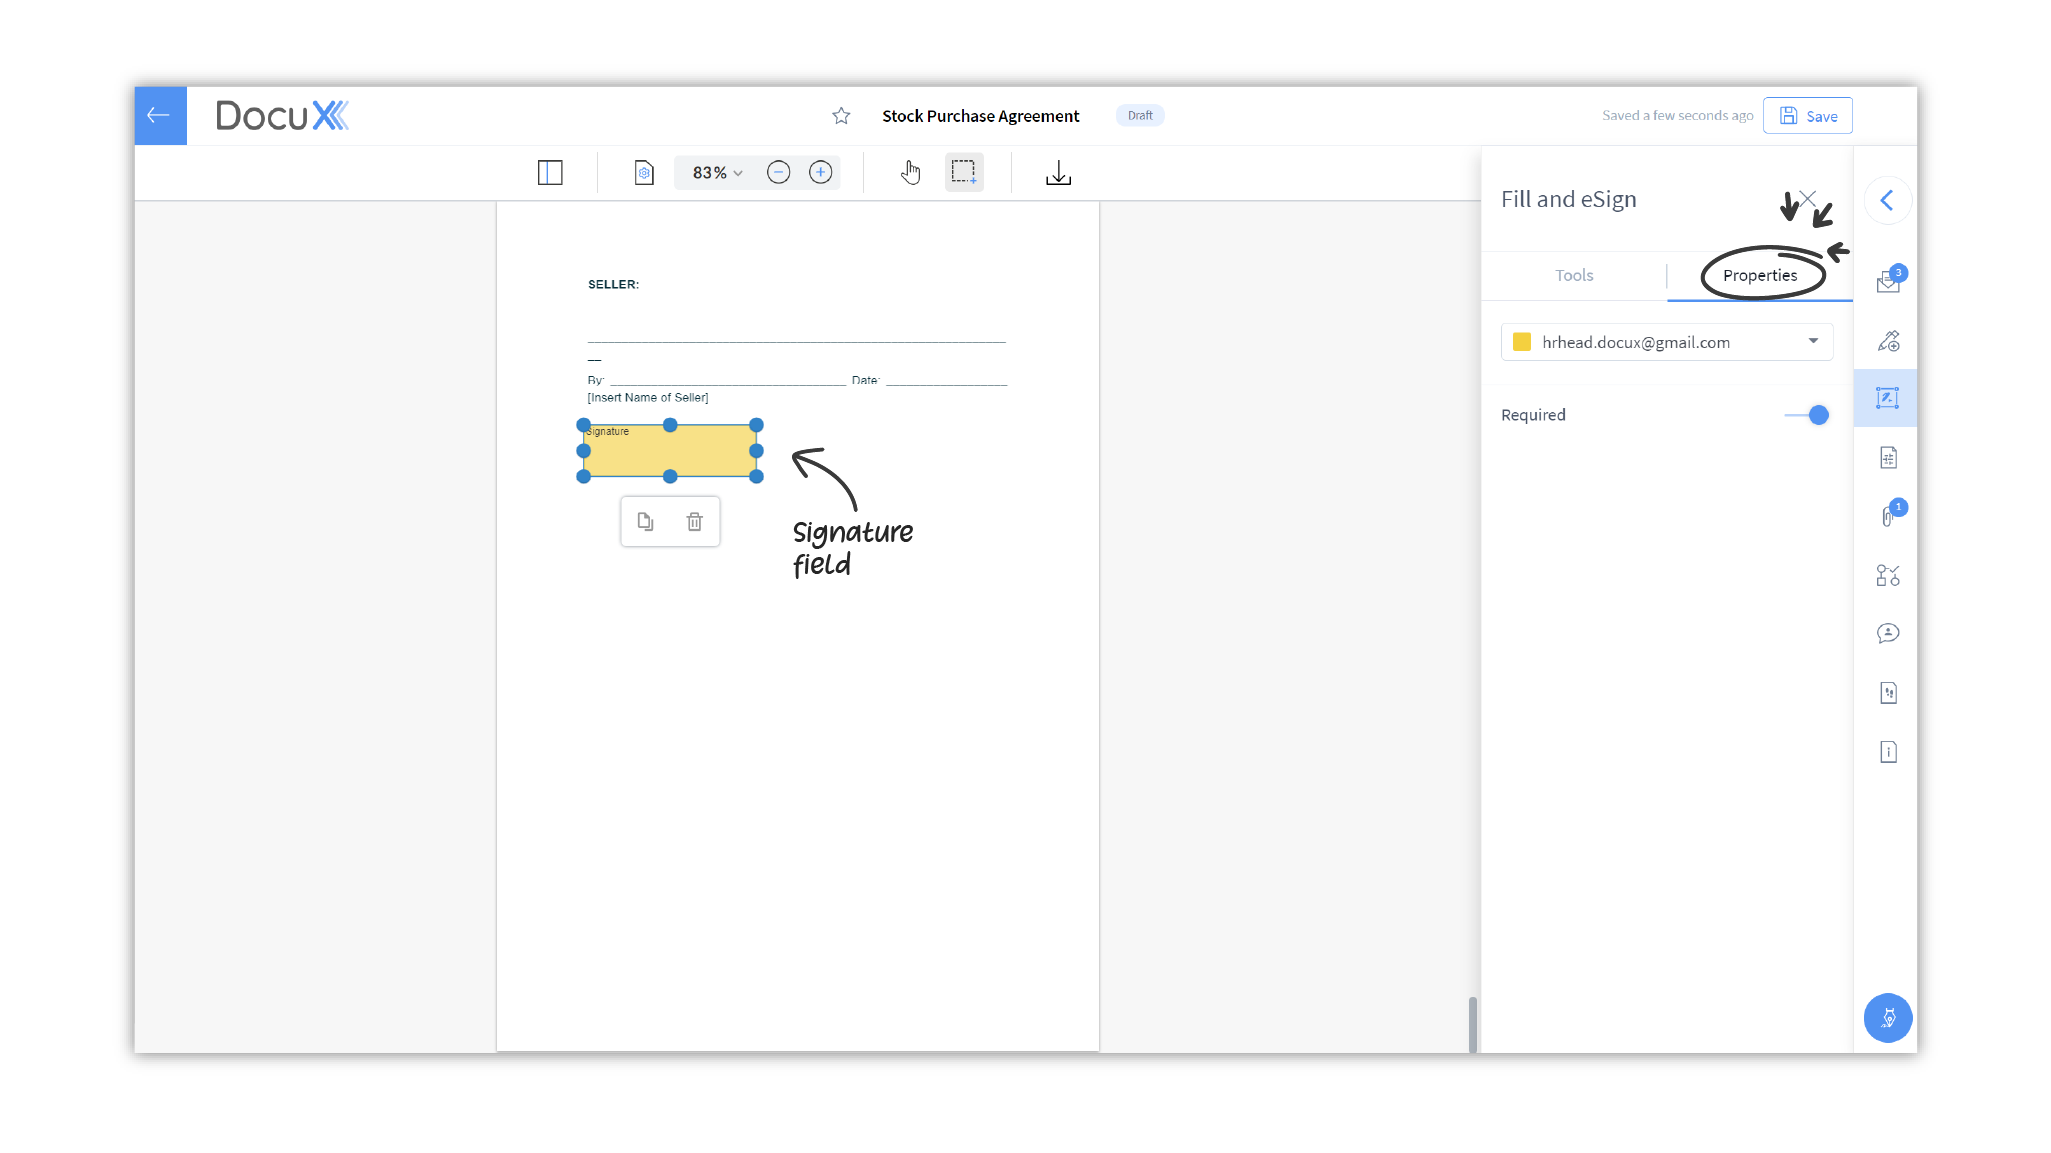
Signature
The Signature field. Can be set as required or optional from the properties tab after placing it on the document.
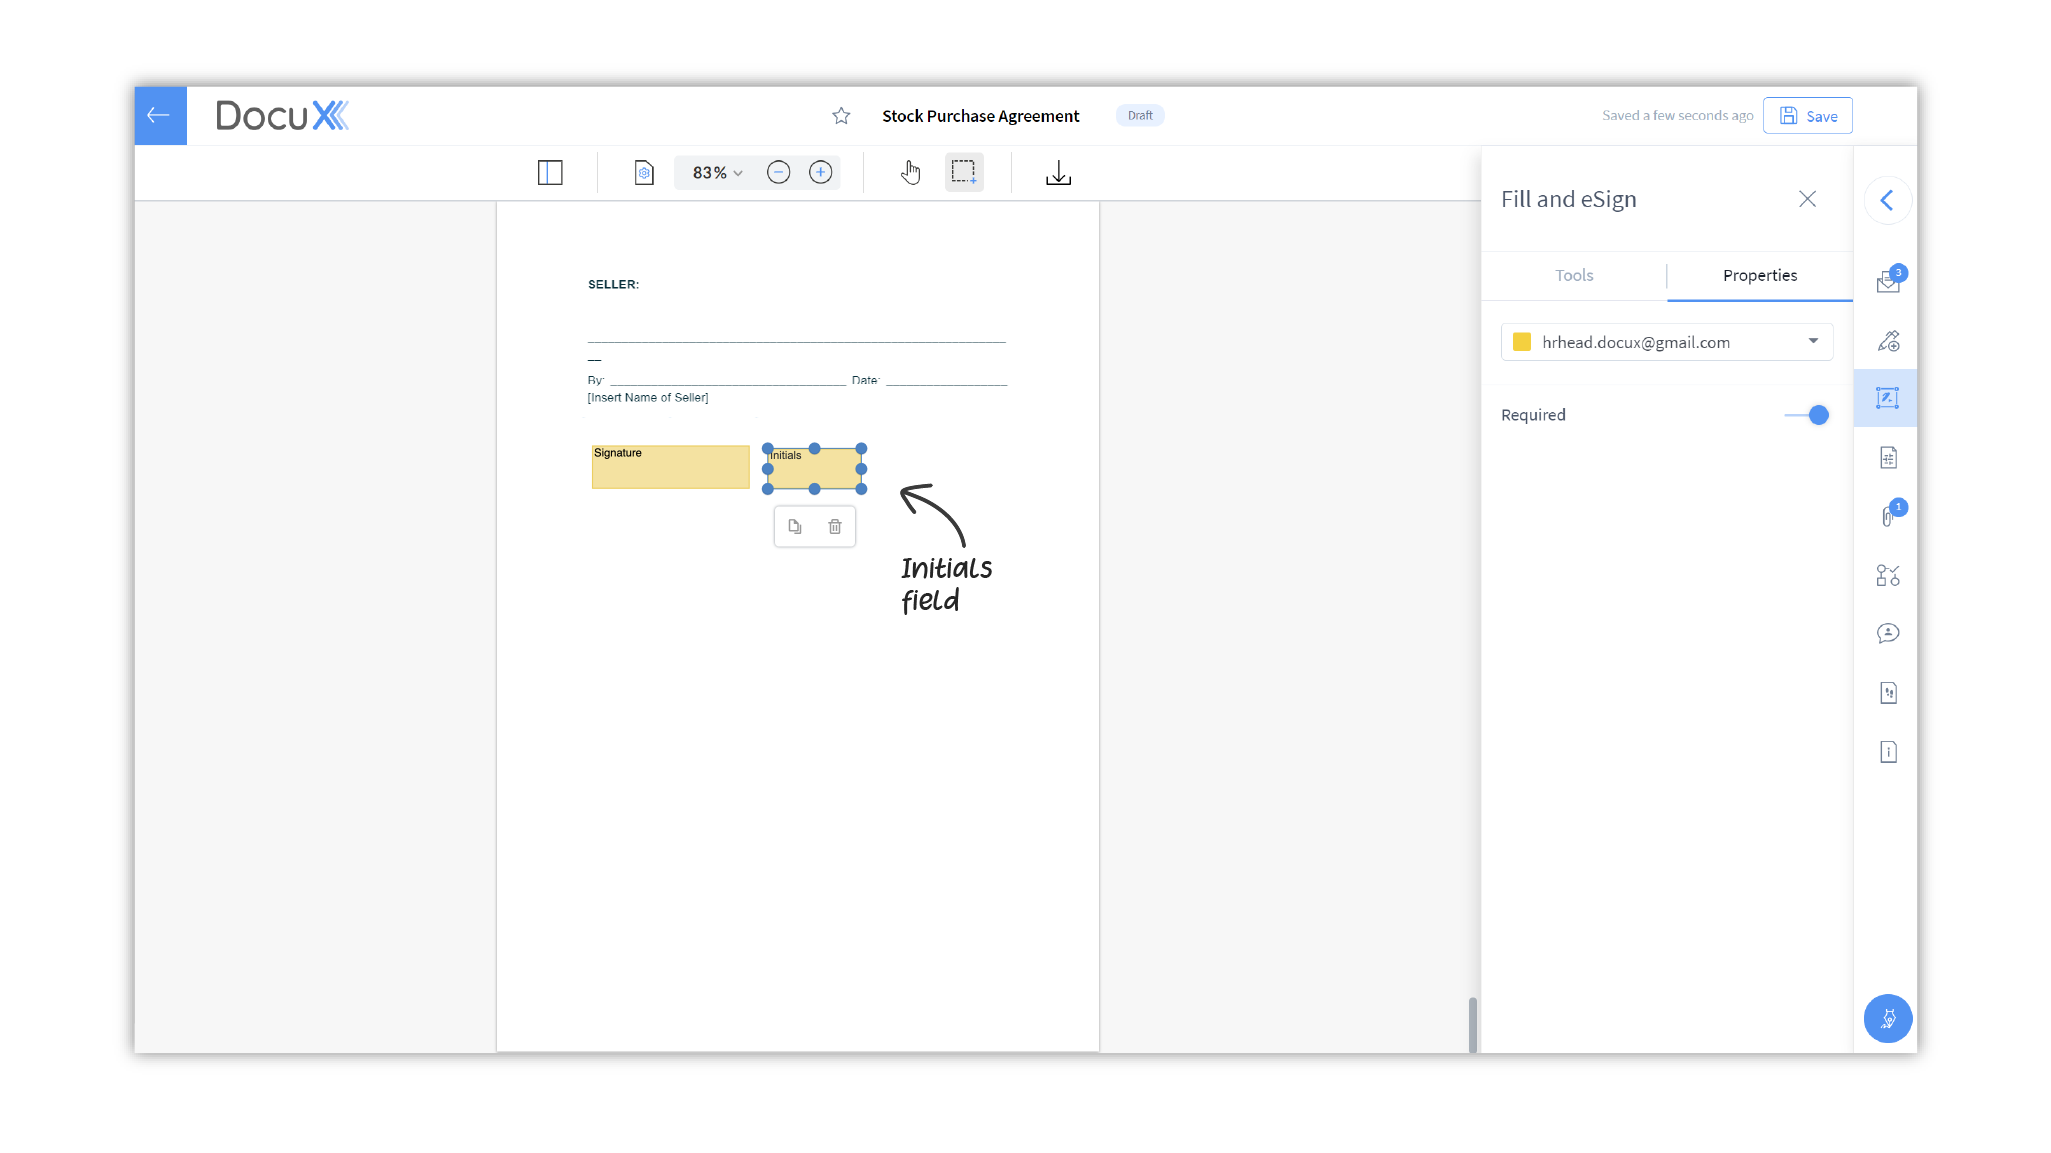
Initials
Where the eSigner can add their initials. Can be set as required or optional from the properties tab after placing it on the document.
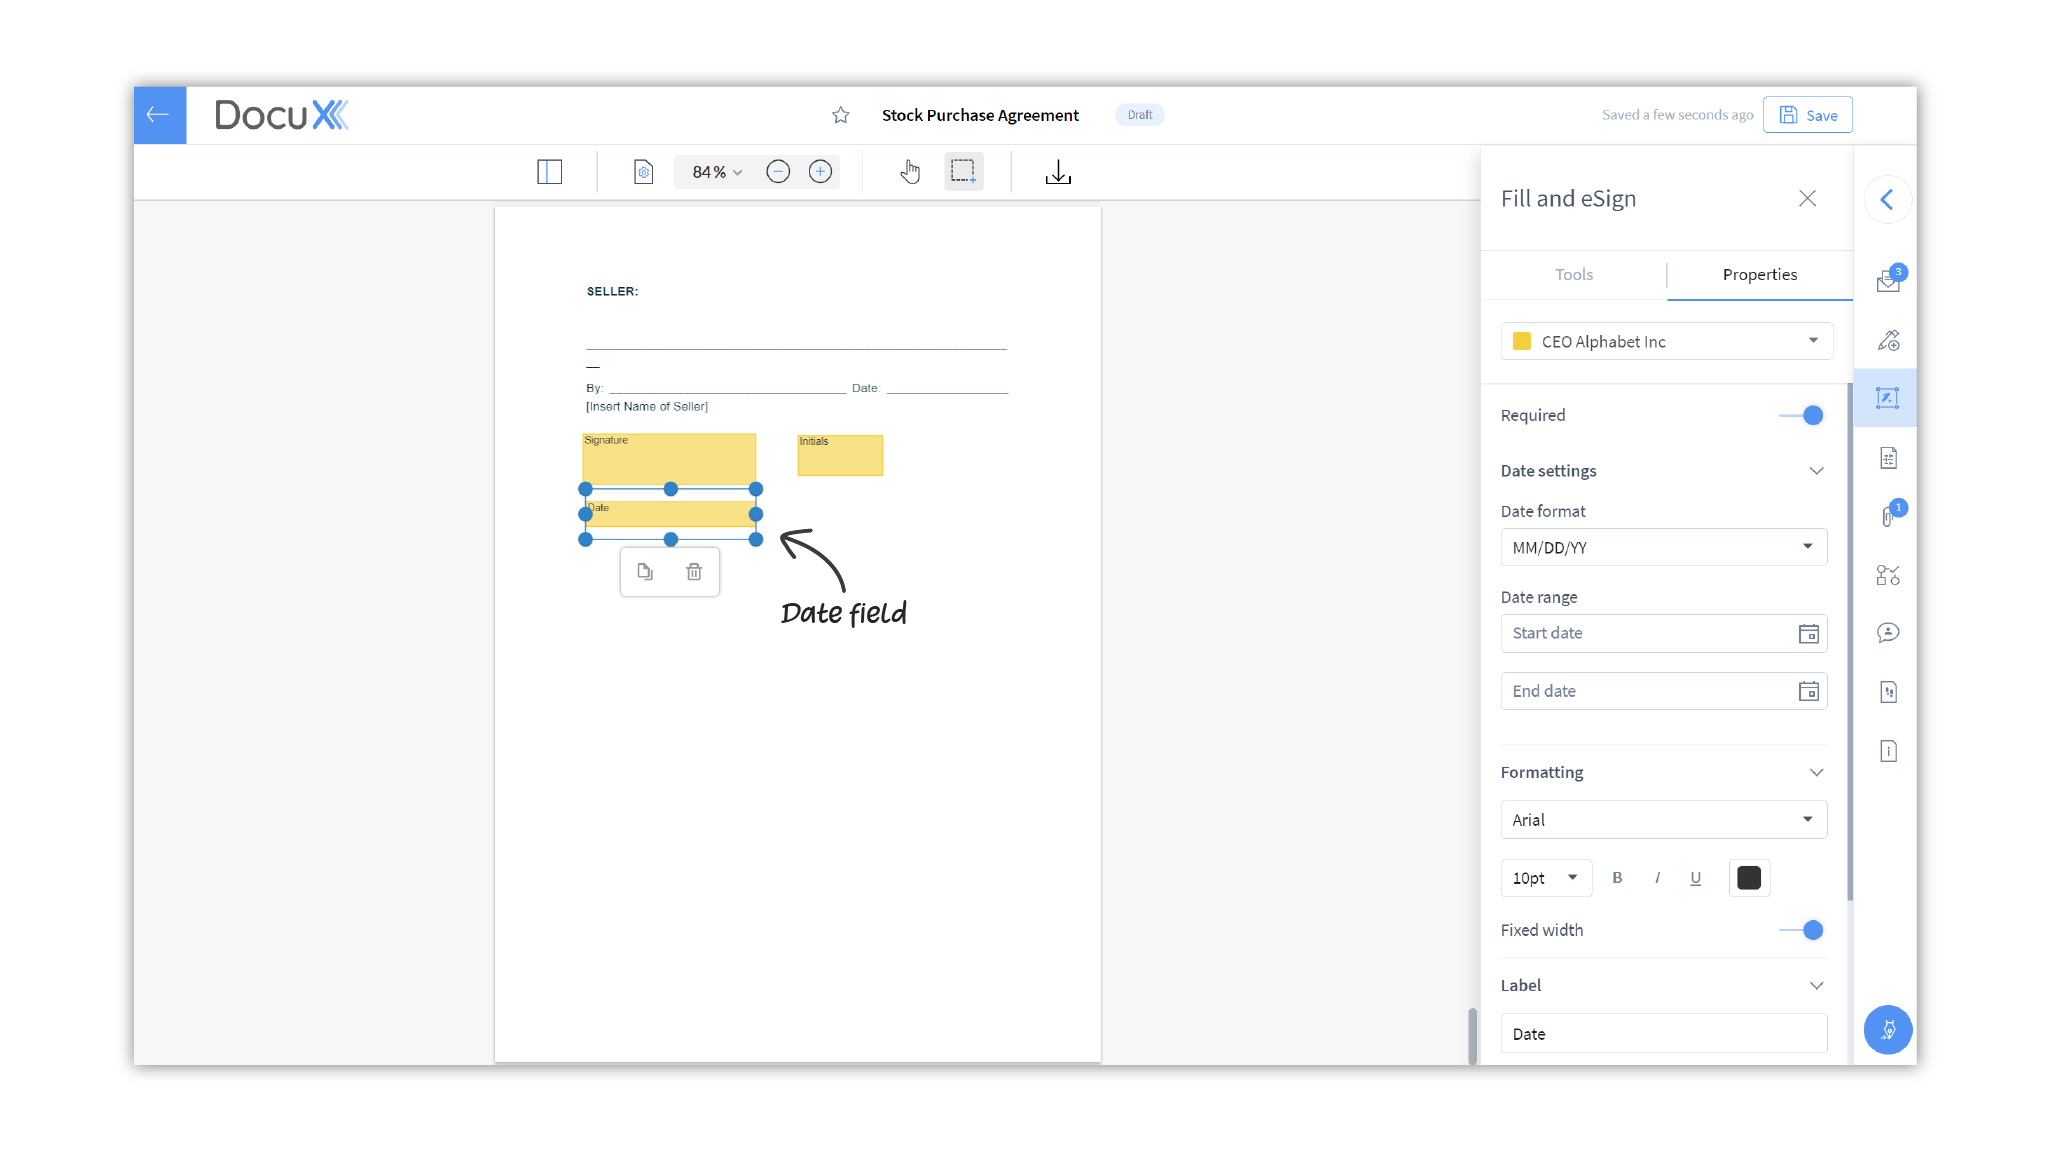
Date
The date field. Properties you can set include:
- Required: Toggle off to set as optional
- Date format: Choose between MM/DD/YY, DD/MM/YY, and YY/MM/DD
- Date range: Specify a start and end date. The eSigner will have to add a date within the range you define.
- Formatting: Once the eSigner adds the date, the font, color, and style you set here will be applied to the date.
- Label: You can choose to add any relevant label here, eg. Contract Expiry or Signed on. The default label is Date.
- Tooltip: Add a tooltip to give additional information to the eSigner about this
field.
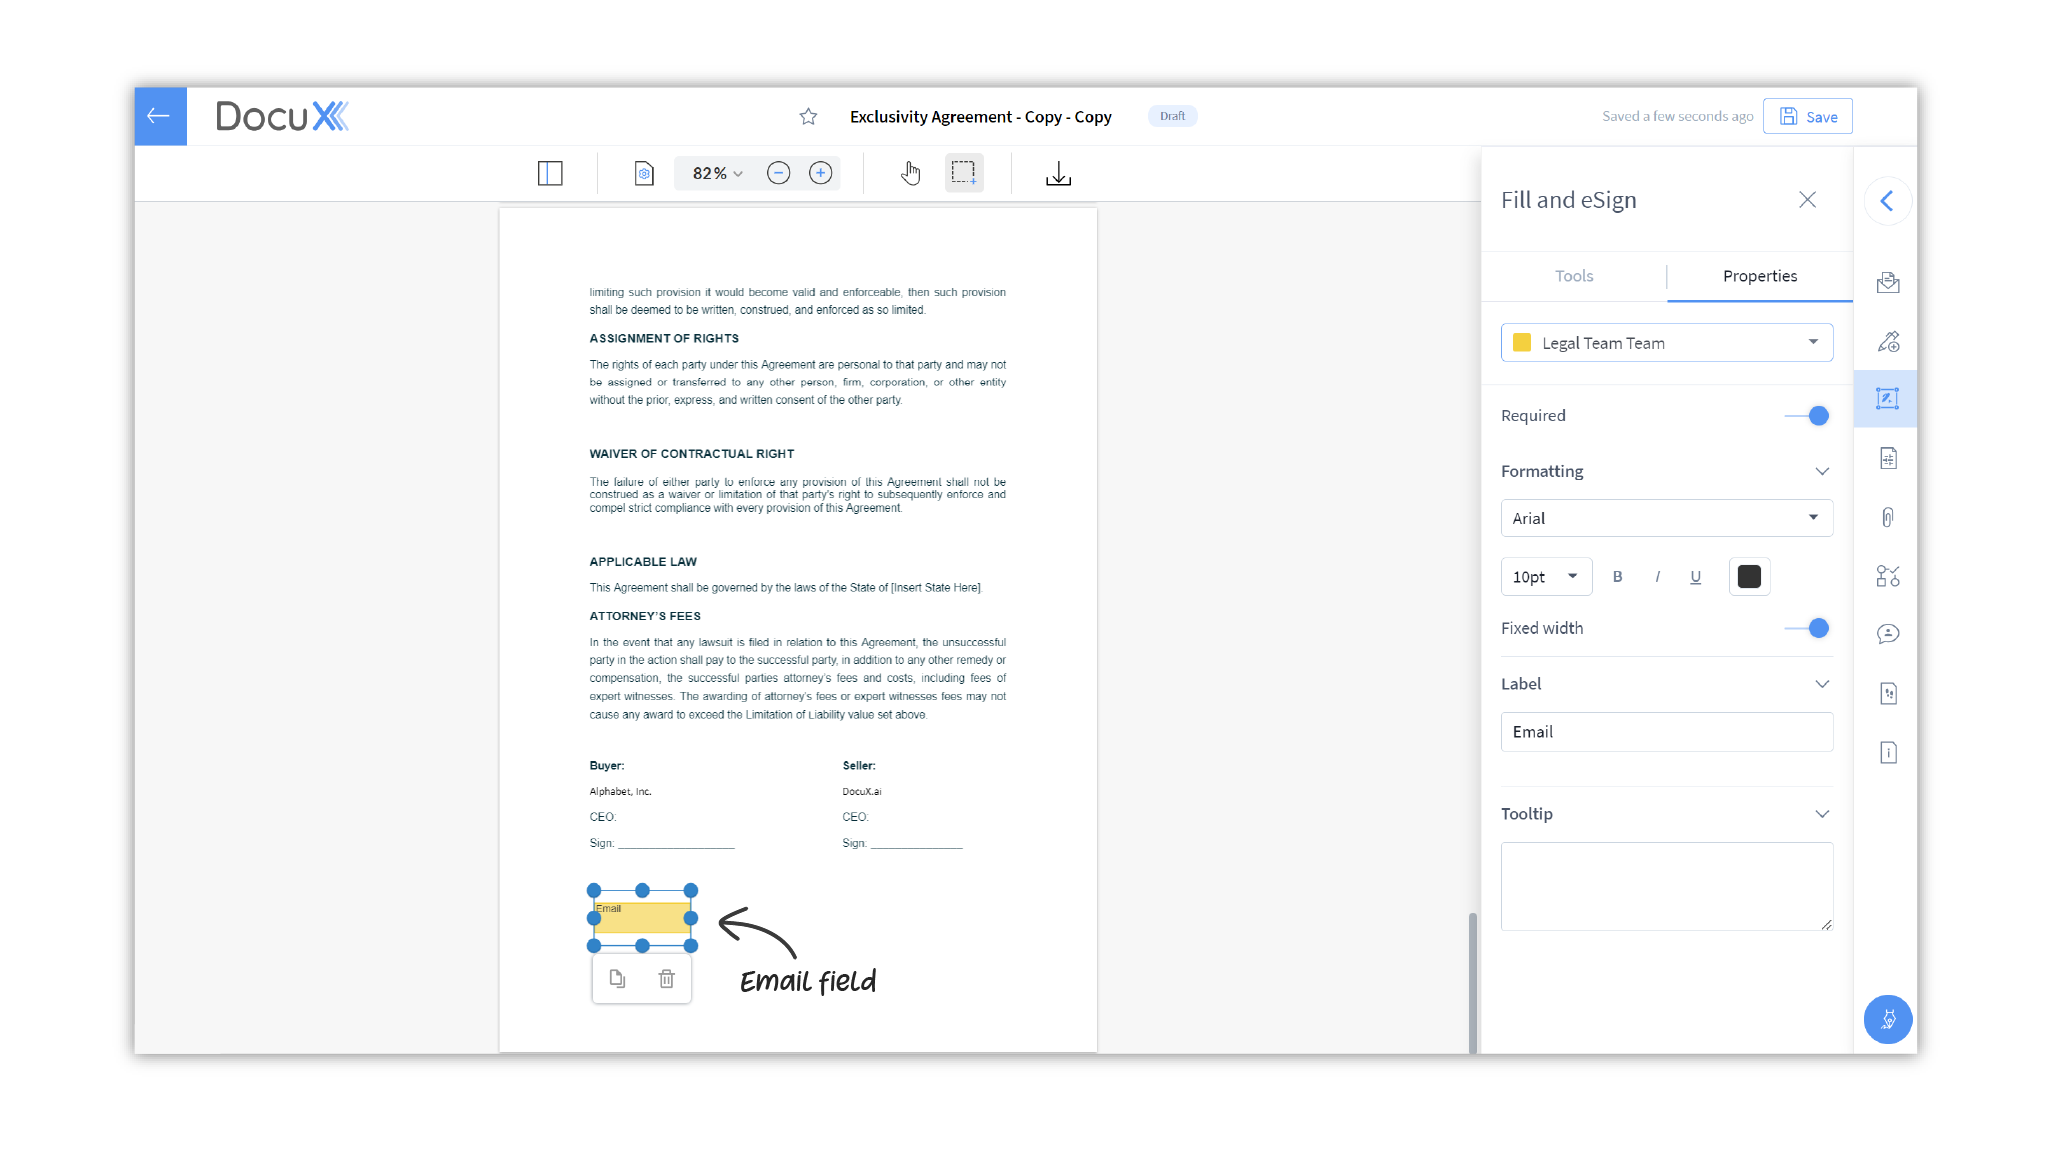
Email
Where the eSigner can add an email address. Properties you can set include:
- Required: Toggle off to set as optional
- Formatting: Once the eSigner adds the email, the font, color, and style you set here will be applied to the email.
- Label: You can choose to add any relevant label here. The default label is Email.
- Tooltip: Add a tooltip to give additional information to the eSigner about this
field.
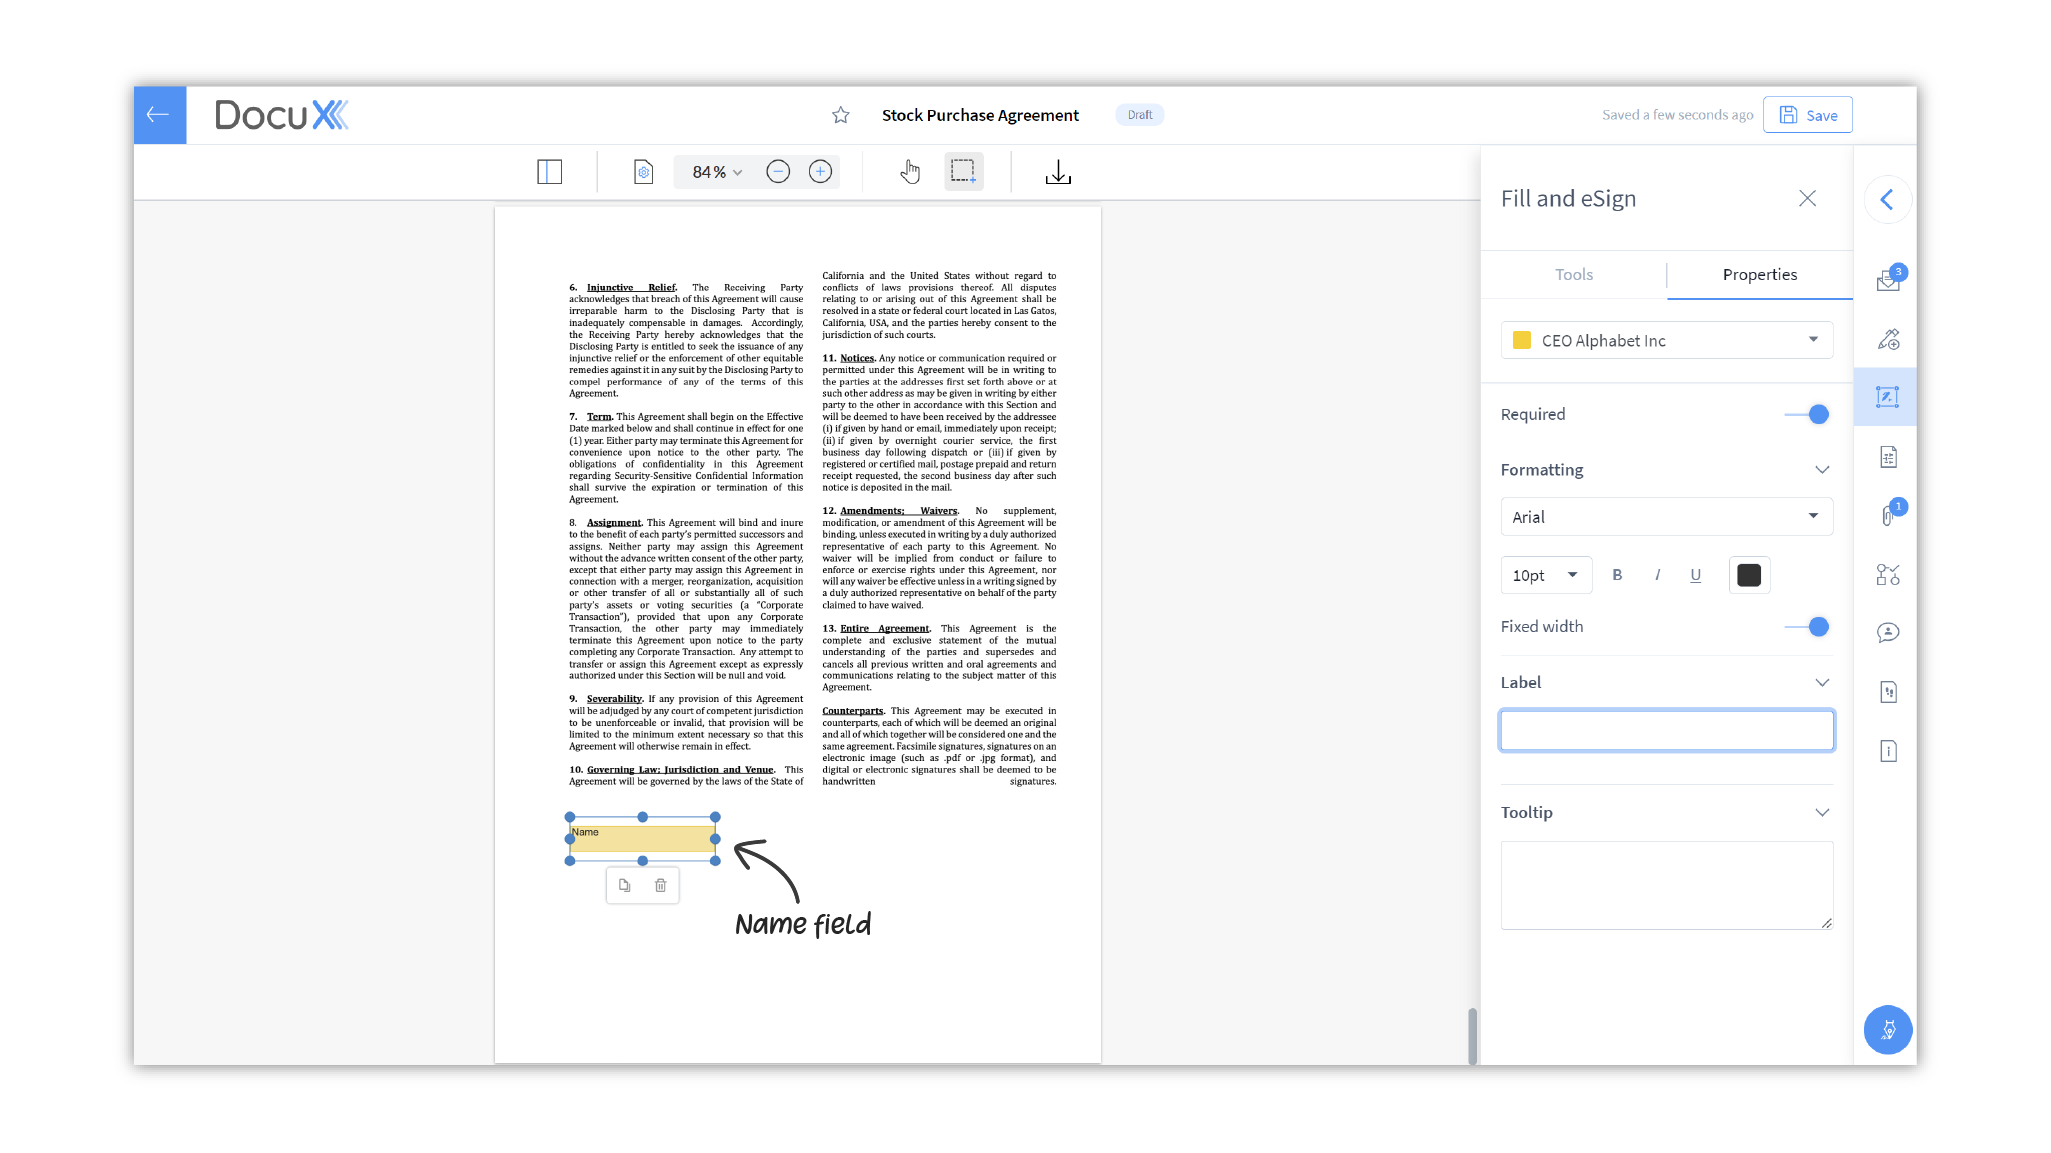
Name
The name field. Properties you can set include:
- Required: Toggle off to set as optional
- Formatting: Once the eSigner adds the name, the font, color, and style you set here will be applied to the name.
- Label: You can choose to add any relevant label here, eg. First name or Full name. The default label is Name.
- Character limit: Define how many characters long the eSigner’s added name can be.
- Tooltip: Add a tooltip to give additional information to the eSigner about this
field.
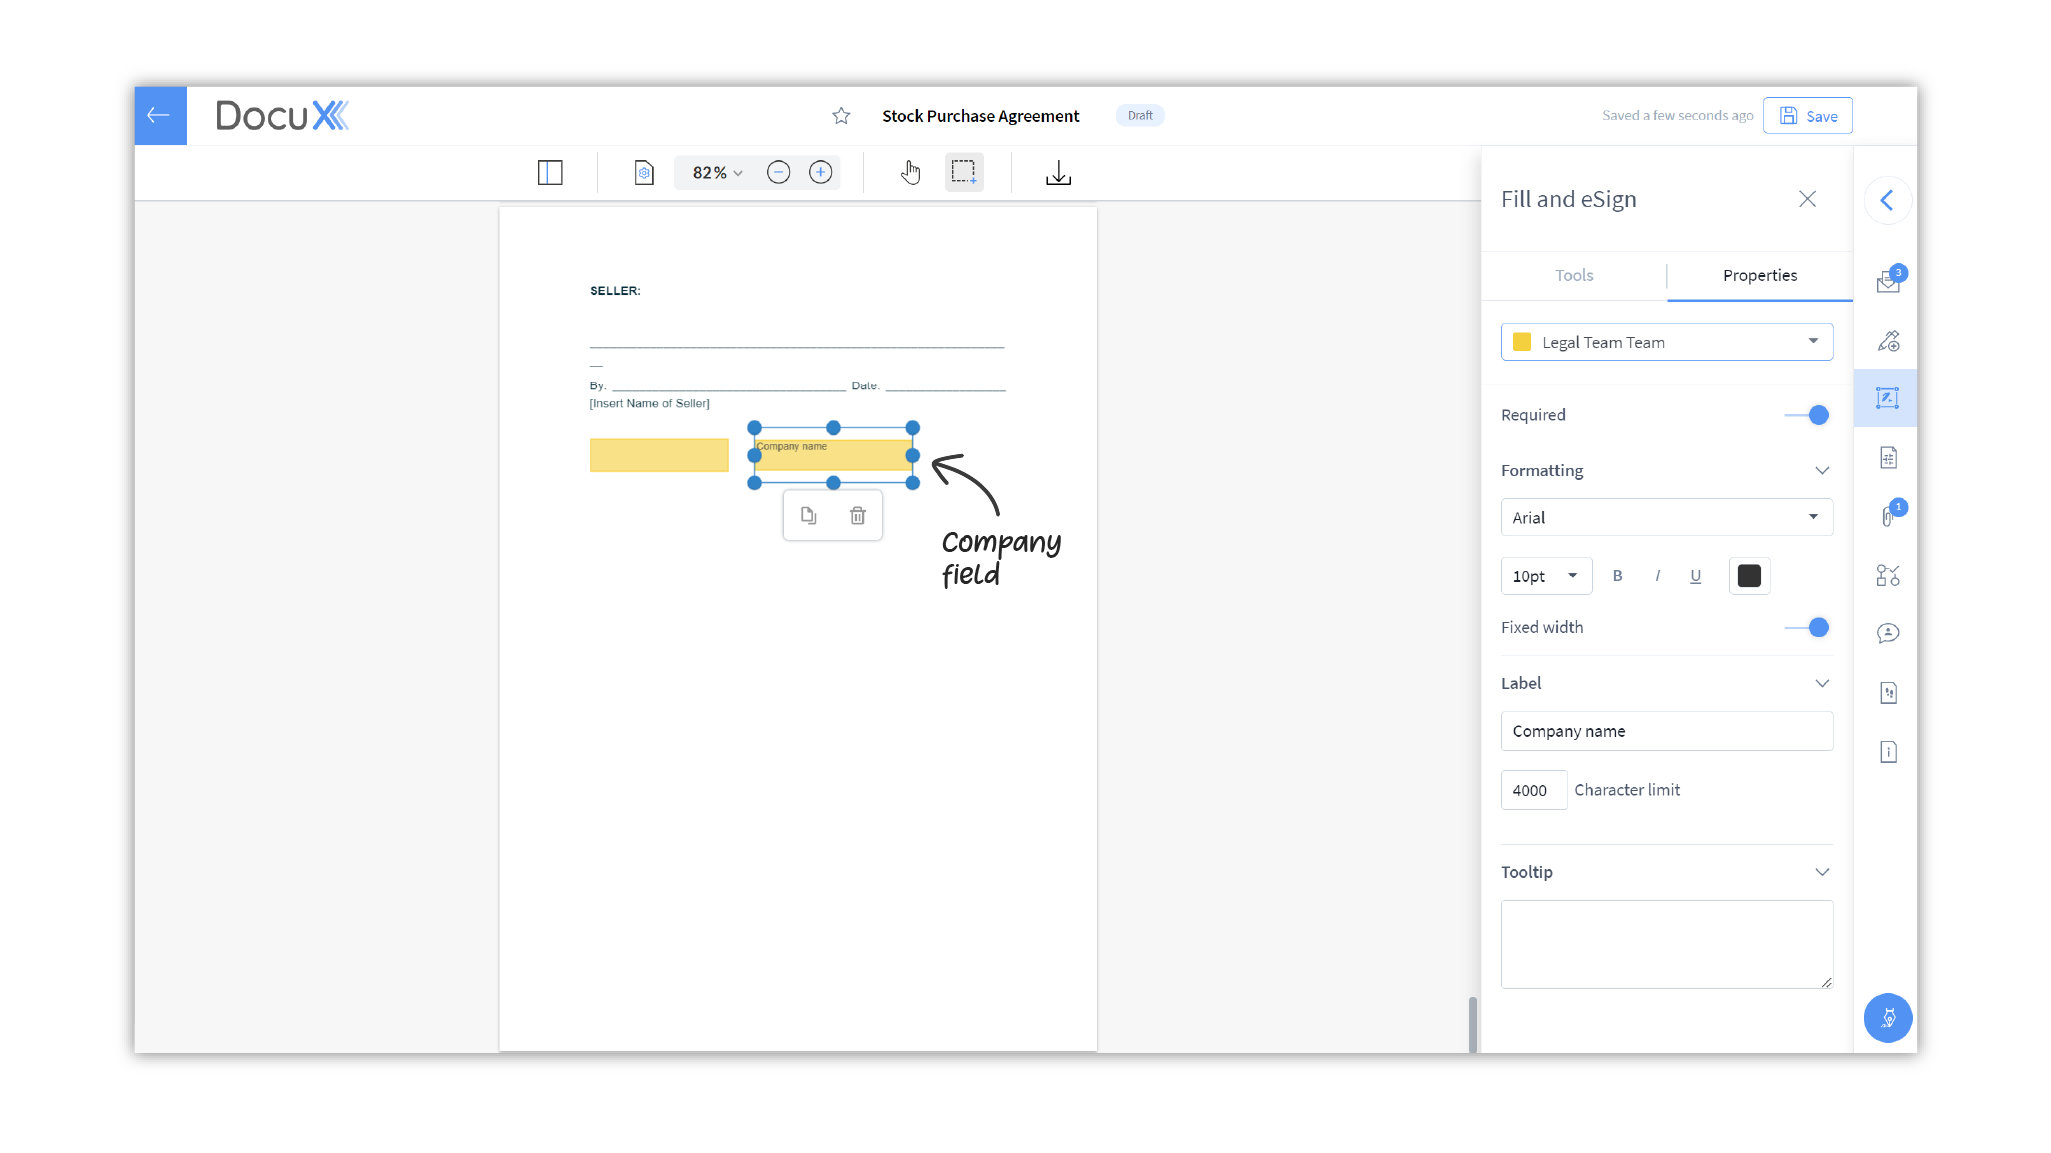
Company name
The company name field. Properties you can set include:
- Required: Toggle off to set as optional
- Formatting: Once the eSigner adds the company name, the font, color, and style you set here will be applied to the company name.
- Label: You can choose to add any relevant label here. The default label is Company name.
- Character limit: Define how many characters long the eSigner’s added company name can be.
- Tooltip: Add a tooltip to give additional information to the eSigner about this
field.
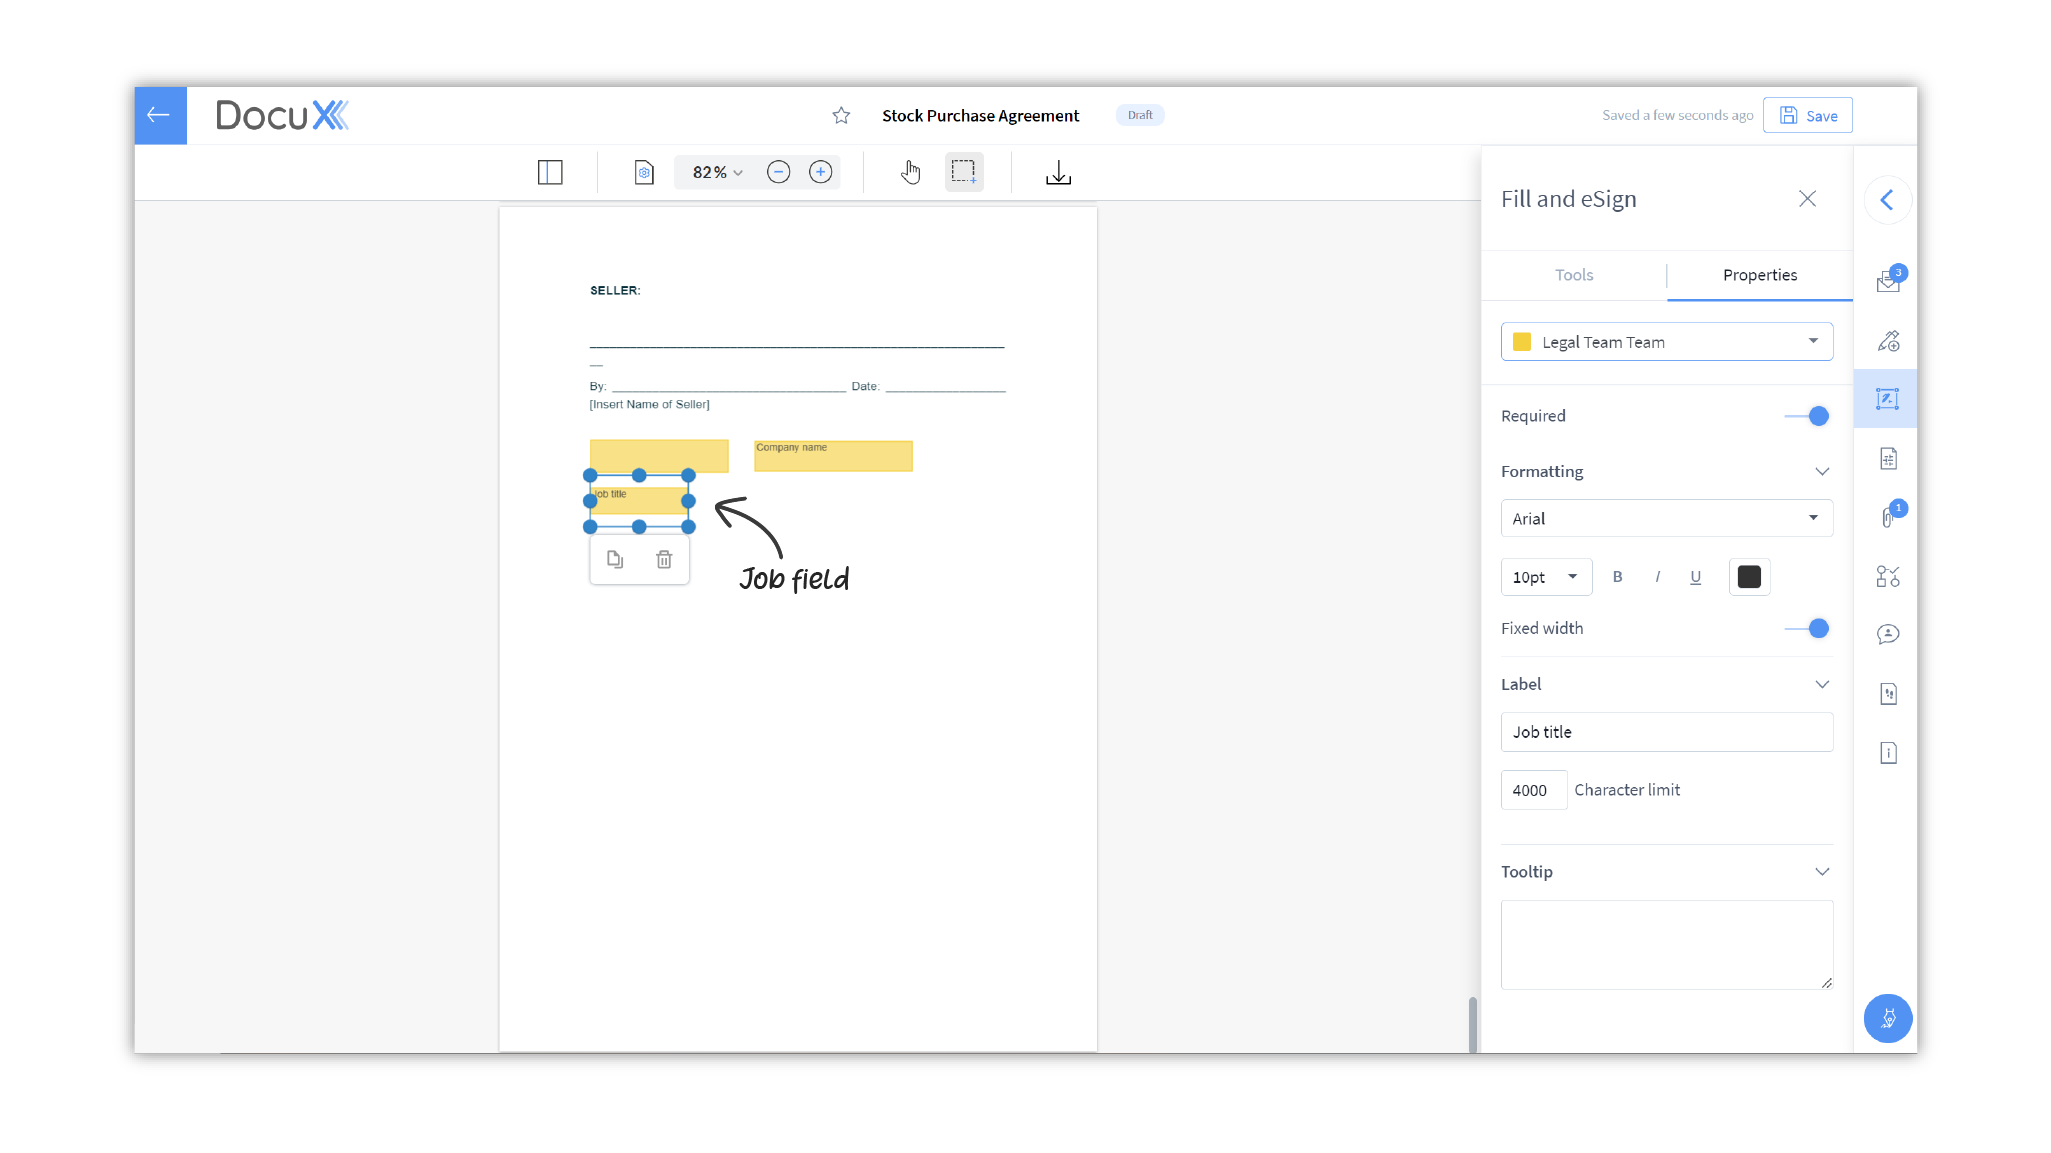
Job title
The job title field. Properties you can set include:
- Required: Toggle off to set as optional
- Formatting: Once the eSigner adds the job title, the font, color, and style you set here will be applied to the job title.
- Label: You can choose to add any relevant label here. The default label is Job title.
- Character limit: Define how many characters long the eSigner’s added job title can be.
- Tooltip: Add a tooltip to give additional information to the eSigner about this
field.
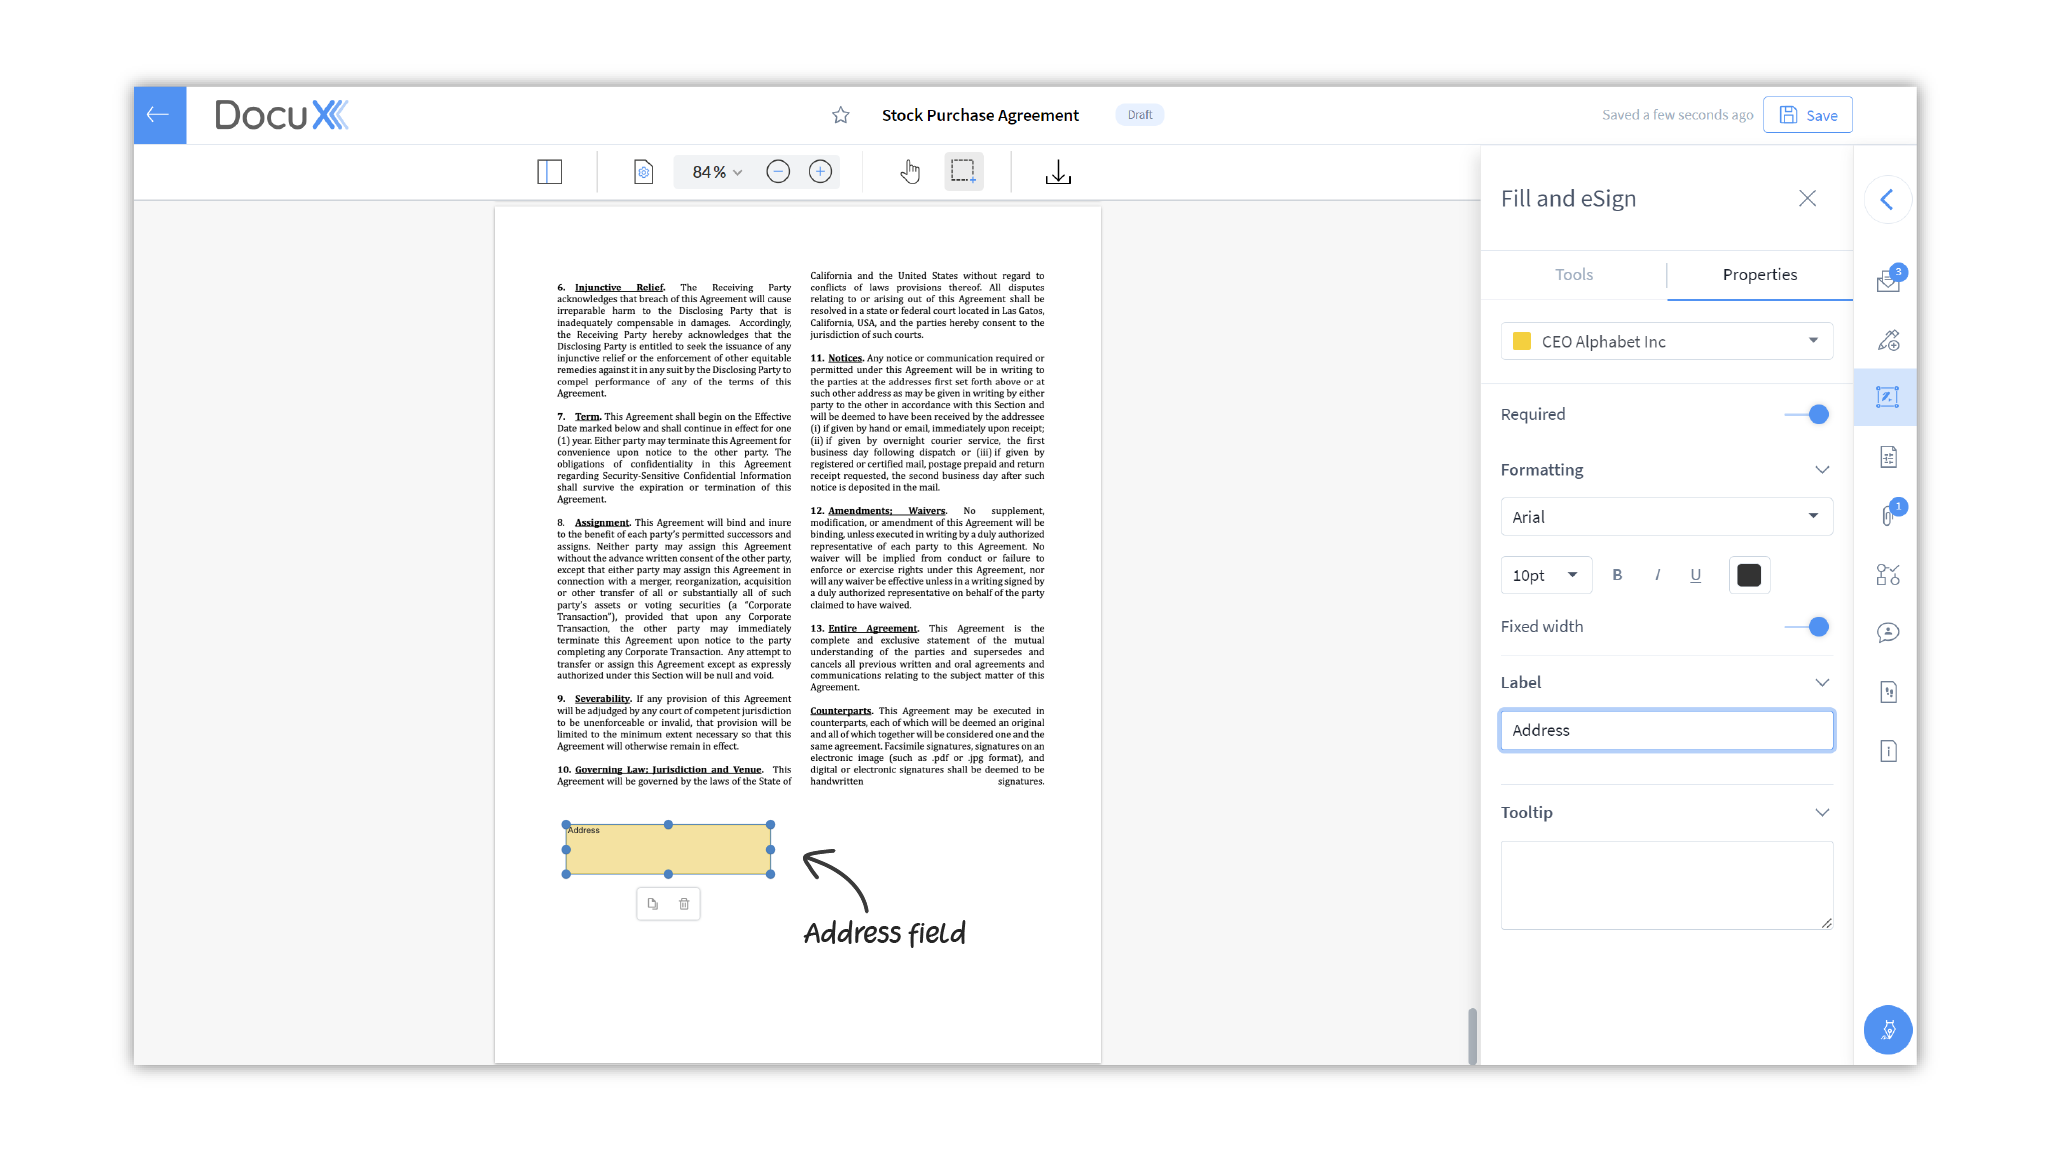
Address
The address field. Properties you can set include:
- Required: Toggle off to set as optional
- Formatting: Once the eSigner adds the address, the font, color, and style you set here will be applied to the address.
- Label: You can choose to add any relevant label here. The default label is Job title.
- Character limit: Define how many characters long the eSigner’s added job title can be.
- Tooltip: Add a tooltip to give additional information to the eSigner about this
field.
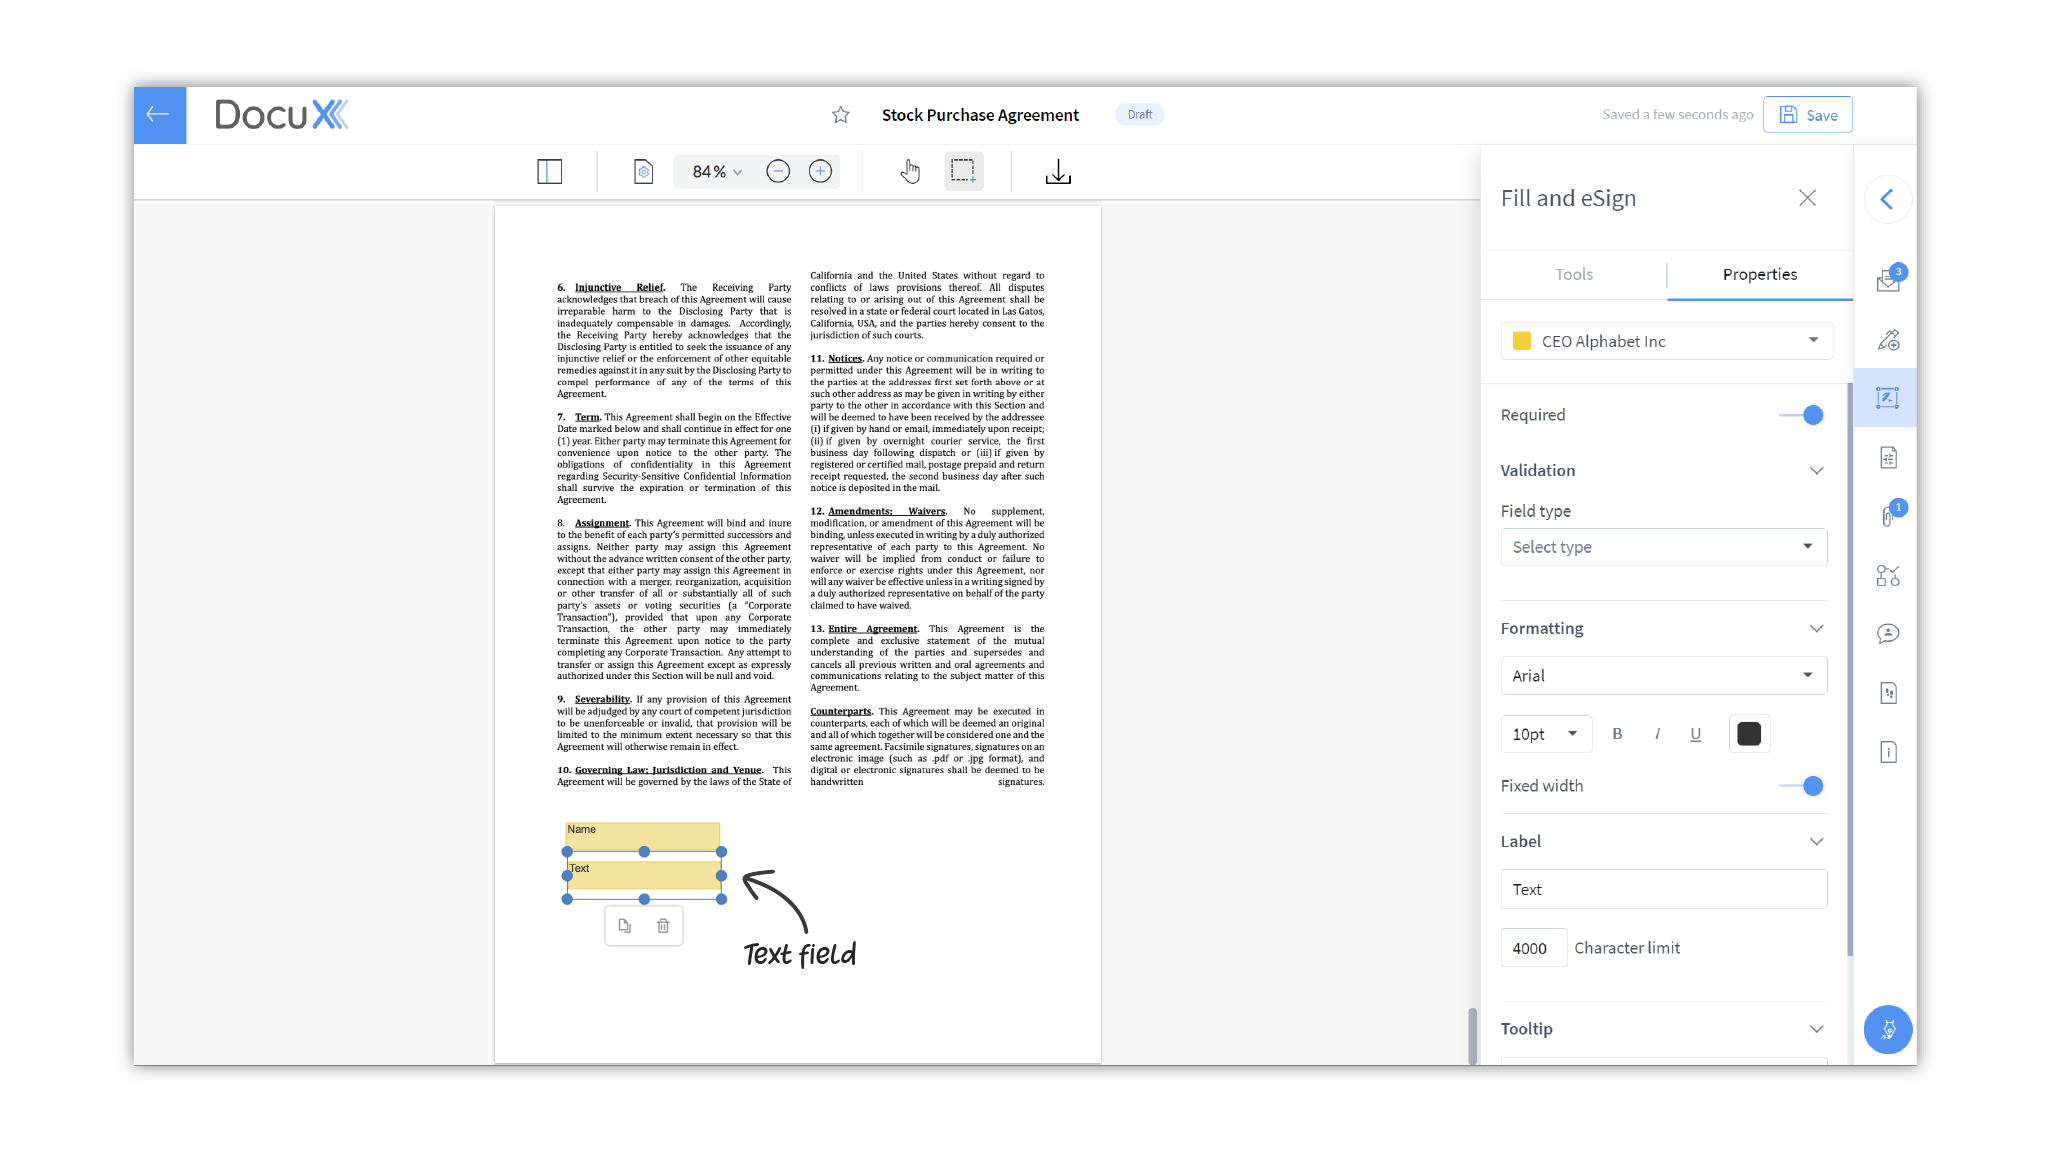
Text
A custom field to act as a catch-all for any other data you may need on your eSigned documents that is not already covered by the fields stated above. Properties you can set include:
- Required: Toggle off to set as optional
- Validation: Select the field type and DocuX will ensure that the data entered by the eSigner matches the data type you expect. Choose from SSN, Letters, and Numbers. If validation is not required, select Not set.
- Formatting: Once the eSigner adds the address, the font, color, and style you set here will be applied to the address.
- Label: You can choose to add any relevant label here. The default label is Job title.
- Character limit: Define how many characters long the eSigner’s added job title can be.
- Tooltip: Add a tooltip to give additional information to the eSigner about this
field.
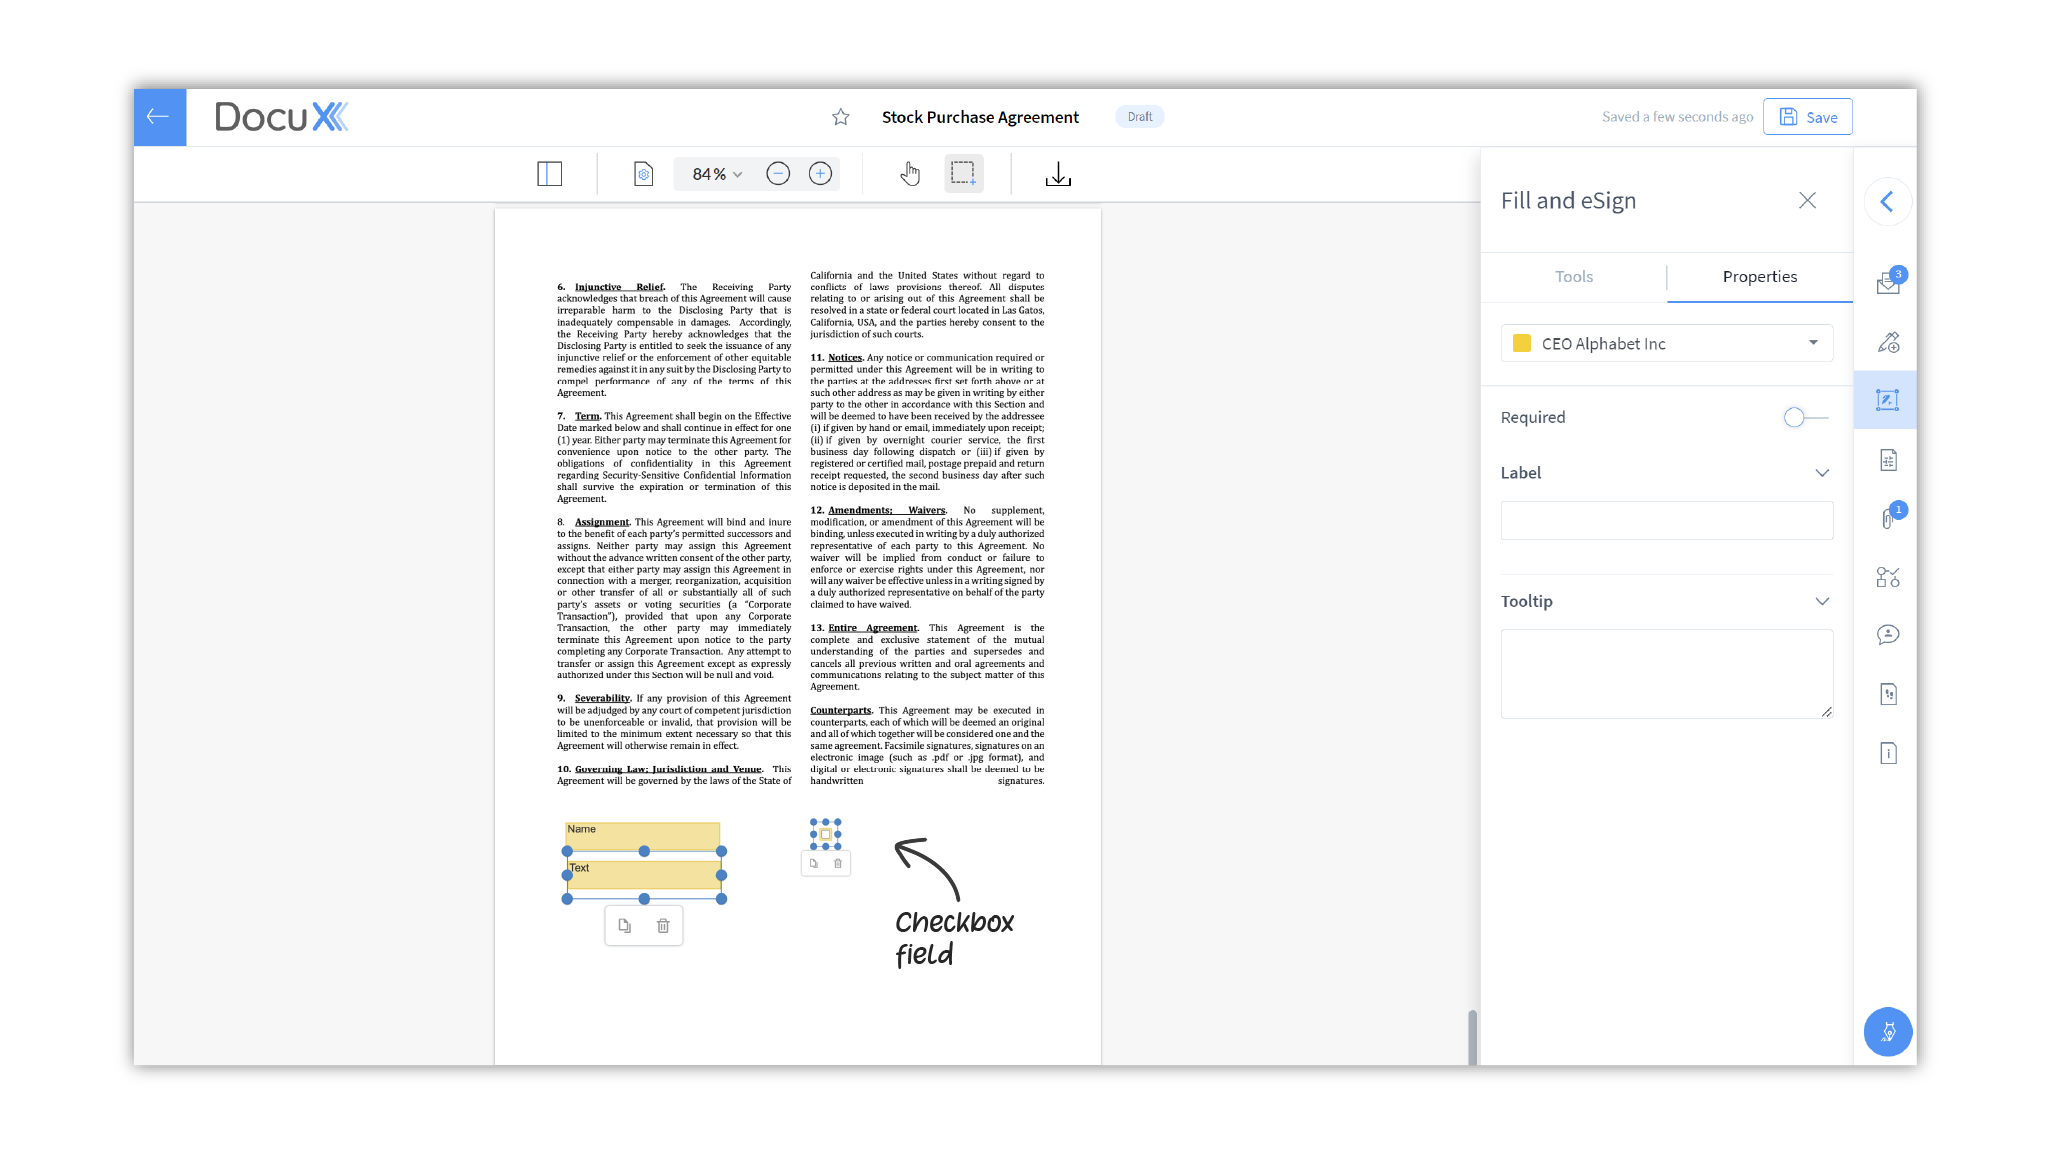
Checkbox
Adds a checkbox. Properties you can set include:
- Required: Toggle off to set as optional.
- Label: Add any relevant label here. Will be displayed to the eSigner in the Fill & eSign tab.
- Tooltip: Add a tooltip to give additional information to the eSigner about this
field. Example: Select the checkbox to accept the terms and conditions.
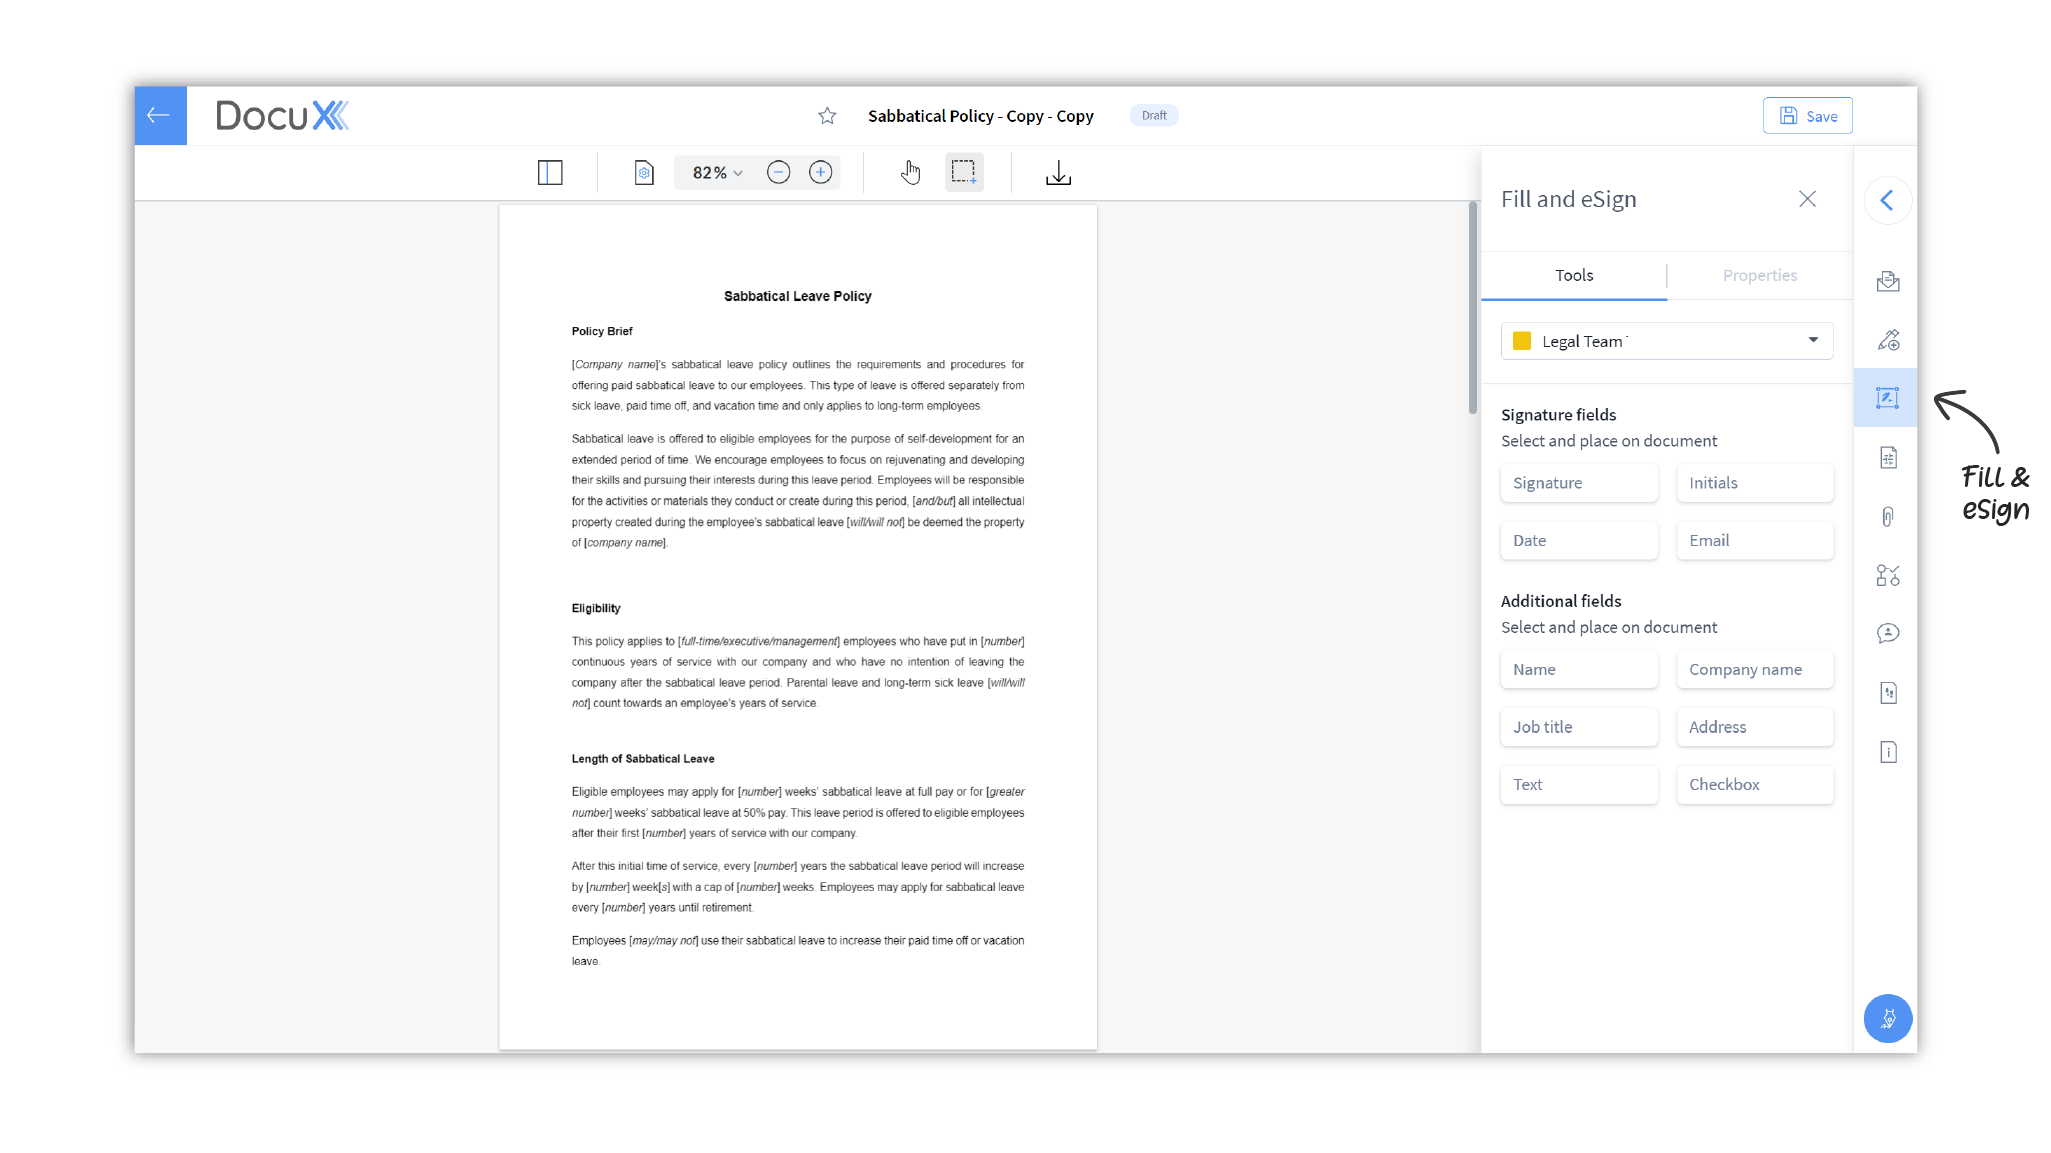
Add stamp fields
You can add multiple stamp fields to a document for multiple eSigners. To add a stamp field:
- Click on the document in the eSign dashboard. This will open the document in the eSign editor.
- In the eSign editor, click on the arrow in the top right corner, below Save to open the control panel.
- Click on Add or manage eSigners. Ensure you have eSigners added.

- Close the Manage eSigners panel. Now click on Fill and eSign in the control panel
- You will see a list of available stamp fields under Tools. Learn more about available stamp fields.
- Select an eSigner from the dropdown given.
Each eSigner will be assigned a different color. This will reflect on the stamp fields you add, making it easy for you to identify the fields added for each
eSigner.

- Click on the stamp field you want to add and then click and drag on the document to place the field in the appropriate location.
To move the field to a different location on the document, hold and drag.
- Set the properties for the stamp field. Learn more about available stamp fields and their properties.
- Once you have added all the required fields for one eSigner, select the next eSigner from the dropdown and repeat.
- Once all stamp fields have been added, close the Fill and eSign panel.
Remove stamp fields
To remove one or more stamp fields from a document:
- Click on the document in the eSign dashboard. This will open the document in the eSign editor.
- Click on the stamp field you wish to delete.

- Click on the delete icon below the field and it will be deleted.
You can only remove stamp fields before sending the document for eSign. Once you hit the Send for eSign button, you cannot delete stamp fields without cancelling the eSign flow.